Cookbook > Basic instructions to set up a Raspberry Pi

In the context of the workshop being held by Matthew Plummer-Fernandez this week at ECAL, Raspberry Pi’s will be available to students.

The Pi’s have already been set up with a basic layer of software / harware, the OS installed is Raspbian (on 8Gb SD’s for the Raspberry Pi B and 16Gb SDxC for the Raspberry Pi B+), the keyboard system is standard International Mac US and the wifi-dongle enables to access the Pi via SSH from another machine. Here’s how we did it from scratch:

Beforehand, gather all the necessary material:  a Raspberry Pi version B or B+ with it’s power adaptor (others untested), 1 USB keyboard, 1 USB Mouse, 1 SD card (min. 8Gb recommended, SDxC if using a Pi B+), 1 USB Wifi-Dongle, 1 Screen (with HDMI connector), 1 USB card reader (optionnal).

Attention: There is no power switch on the Pi, which means you turn it on when you plug it in the power source (and vice versa ;), choose the right moment to do so. Raspberry Pi B+ have 2 extra USB ports. We noticed that having 3 ports used during setup often results in one of them not working (this model probably doesn’t handle well power distribution). If your keyboard or mouse seems dead, plug it back in again changing ports. If you remove the wifi-dongle form your Pi while it’s running, it crashes.

-

Setting up the Pi:

1. Download the latest NOOBS package from www.raspberrypi.org/downloads

2. Download the latest SD Formatter form the SD Association website and format your SD card. Disk utility or simple delete and trash procedures may not erase all the bytes and leave clusters which might cause problem during installation on the Pi. Note: if you encounter difficulties formatting the card (ie. don’t have the administrator rights to do it) use an external card reader.

3. Unzip the NOOBS Package and copy it’s contents to the card.

4. Insert your card into the Pi, connect the wifi-dongle, the keyboard, the mouse and the screen, once everything is connected, plug in the power the power adaptor. The Pi will boot and you will be brought to a welcome screen where you can choose your installation type. Choose Raspbian and click install. A modal dialog will appear informing you about the total erasure of the data on the SD card, click OK.

5. Once installed, you will automatically be brought to the raspi-config shell. Don’t worry, your Pi has more than this interface, however, this is where you can setup the most interesting parameters (ie. configure the Pi for a camera board, for SSH, ect.). By navigating with arrows + Tab + Enter, setup your time and date, keyboard model, finally go to the advanced panel and enable SSH (you can do the SSH part later on if you prefer). Please don’t change the password. Exit the config by choosing Finish.

6. To log in and access the Pi, use the information appearing on the side of your machine’s case. Note: You will not see the password while typing, this is normal. If your password doesn’t work, you probably didn’t setup your keyboard correctly, try typing your password in the Login field to verify this. You will the be brought to your first command prompt.

7. Type startx to load the GUI.

7.1. To go back to raspi-config while in the GUI, just open a Terminal window and type in raspi-config .


Setting up the Wifi-dongle:

8. In the GUI, click on Wifi-config. Once open, click on the scan button. A window will open, click scan again.

9. Double-click on the wifi network you want to connect to. You have to know which security and authentication protocol the network uses to set up a connection. The best way to do that is to have another computer (we used a mac) connected to the same network and navigate to your Network Preference Pane > Advanced. Note that on your Pi, you must enter at least four fields for the connection to work: the network type (ie. WPA), the security protocol (ie. TKIP), the User and the Password. Click Ok and wait for the connection to establish (~20 sec).

10. To verify your connection open Epiphany Web Browser and type in a URL. Don’t expect the craziest Webgl experience ever.


Connecting to your Pi via SSH:

11. To connect to your Pi from another computer you’ll need two things: your wifi-dongle to be established and working (we assume you followed the steps) and your Pi’s IP adress. Here’s how to get it. Open a terminal window and type ifconfig . Look into the WLAN0 paragraph for the part where there’s the following “inet addr: xxx.xxx.x.xxx“. The “xxx.xxx.x.xxx” is your local IP address. Note that every time you start up your Pi again, the address changes and that in order to connect via SSH with a local IP address both computers must be on the same network.

12. On the computer you want to connect to your Pi from, open a terminal window and type ssh pi@xxx.xxx.x.xxx . You will be asked for the Pi’s Login and password. That all. Enjoy ;)

–-

Sources:

http://www.raspberrypi.org/help/noobs-setup/

http://www.maketecheasier.com/setup-wifi-on-raspberry-pi/

-

Resources:

How to connect to your Pi via SSH, transfer files via SFTP, share screen via VNC and last but not least, access your Pi over the internet:

http://computers.tutsplus.com/tutorials/take-control-of-your-raspberry-pi-using-your-mac-pc-ipad-or-phone–mac-54603

Shell command basics for your Pi, which you must read, learn and worship:

http://www.raspberrypi.org/documentation/linux/usage/commands.md

And to shut down your Pi from the command line:

sudo shutdown -h now
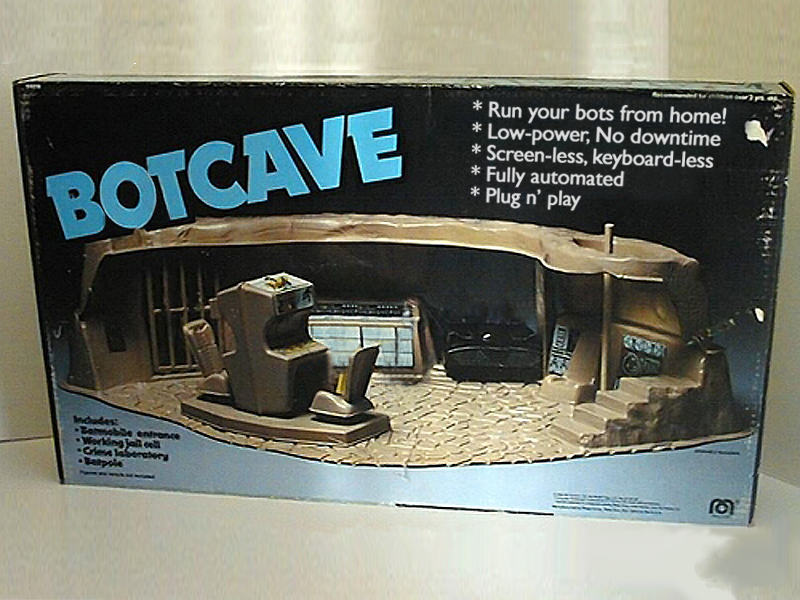
 

I&IC Workshop #3 with Algopop at ECAL, brief: “Botcaves”

Note: I publish here the brief that Matthew Plummer-Fernandez (a.k.a. Algopop) sent me before the workshop he’ll lead next week (17-21.11) with Media & Interaction Design students from 2nd and 3rd year Ba at the ECAL.

This workshop will take place in the frame of the I&IC research project, for which we had the occasion to exchange together prior to the workshop. It will investigate the idea of very low power computing, situated processing, data sensing/storage and automatized data treatment (“bots”) that could be highly distributed into everyday life objects or situations. While doing so, the project will undoubtedly address the idea of “networked objects”, which due to the low capacities of their computing parts will become major consumers of cloud based services (computing power, storage). Yet, following the hypothesis of the research, what kind of non-standard networked objects/situations based on what king of decentralized, personal cloud architecture?

The subject of this workshop explains some recent posts that could serve as resources or tools for this workshop, as the students will work around personal “bots” that will gather, process, host and expose data.

Stay tuned for more!


Botcaves

botcave-workshop-image


Algorithmic and autonomous software agents known as bots are increasingly participating in everyday life. Bots can potentially gather data from both physical and digital activity, store and share data in the ‘cloud’, and develop ways to communicate and learn from their databases. In essence bots can animate data, making it useful, interactive, visual or legible. Bots although software-based require hardware from which to run from, and it is this underexplored crossover between the physical and digital presence of bots that this workshop investigates.

You will be asked to design a physical ‘housing’ or ‘interface’, either bespoke or hacked from existing objects, for your personal bots to run from. These botcaves would be present in the home, workspace or other, permitting novel interactions between the digital and physical environments that these bots inhabit.

Raspberry Pis, template bot code, APIs, cloud storage, existing services (Twitter, IFTTT, etc) and physical elements (sensors, lights, cameras, etc) may be used in the workshop.


Bio

British/ Colombian Artist and Designer Matthew Plummer-Fernandez makes work that critically and playfully examines sociocultural entanglements with technologies. His current interests span algorithms, bots, automation, copyright, 3D files and file-sharing. He was awarded a Prix Ars Electronica Award of Distinction for the project Disarming Corruptor; an app for disguising 3D Print files as glitched artefacts. He is also known for his computational approach to aesthetics translated into physical sculpture.

For research purposes he runs Algopop, a popular tumblr that documents the emergence of algorithms in everyday life as well as the artists that respond to this context in their work. This has become the starting point to a practice-based PhD funded by the AHRC at Goldsmiths, University of London, where he is also a research associate at the Interaction Research Studio and a visiting tutor. He holds a BEng in Computer Aided Mechanical Engineering from Kings College London and an MA in Design Products from the Royal College of Art.


http://www.plummerfernandez.com
http://algopop.tumblr.com

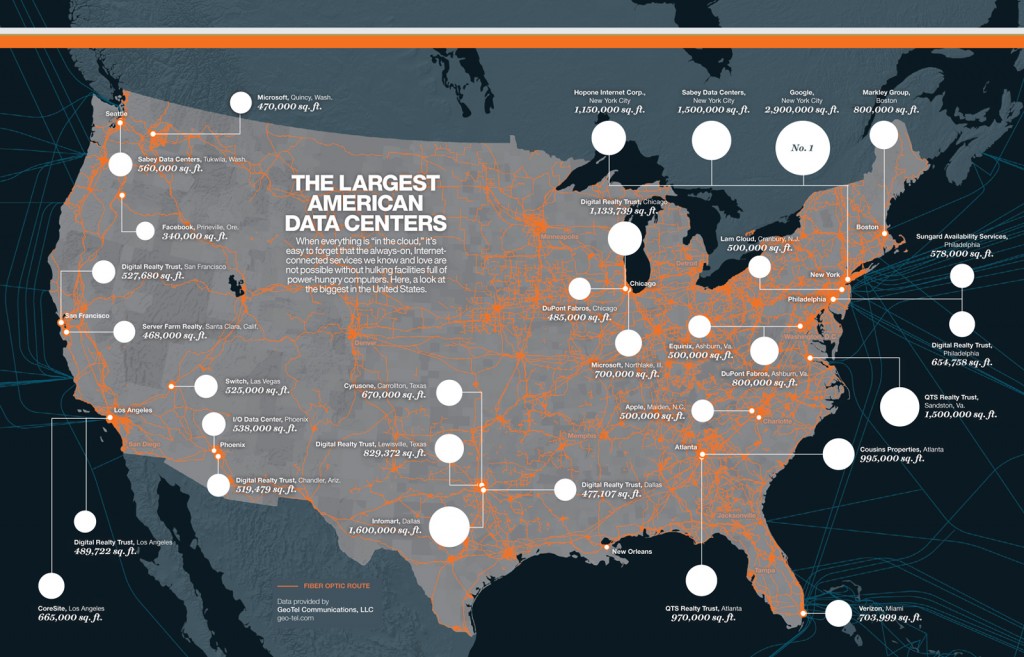
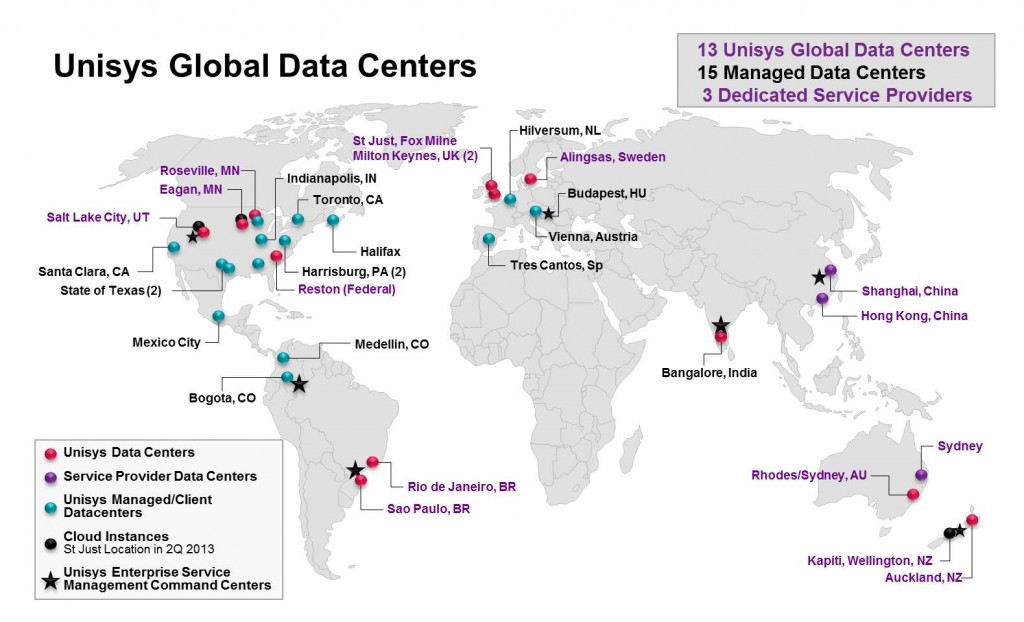
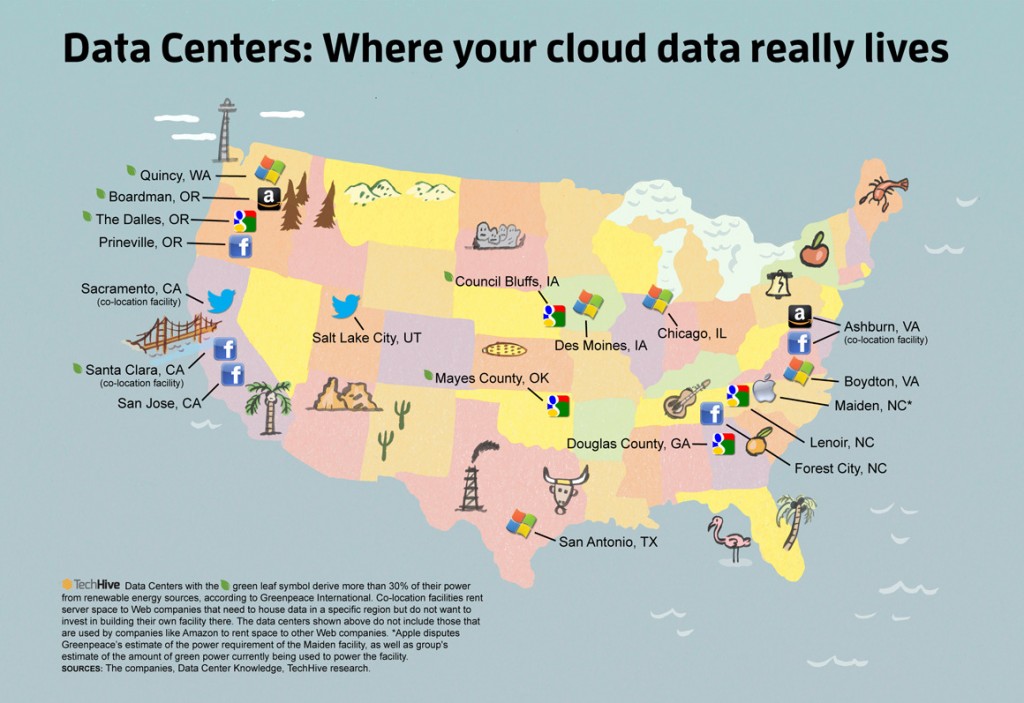
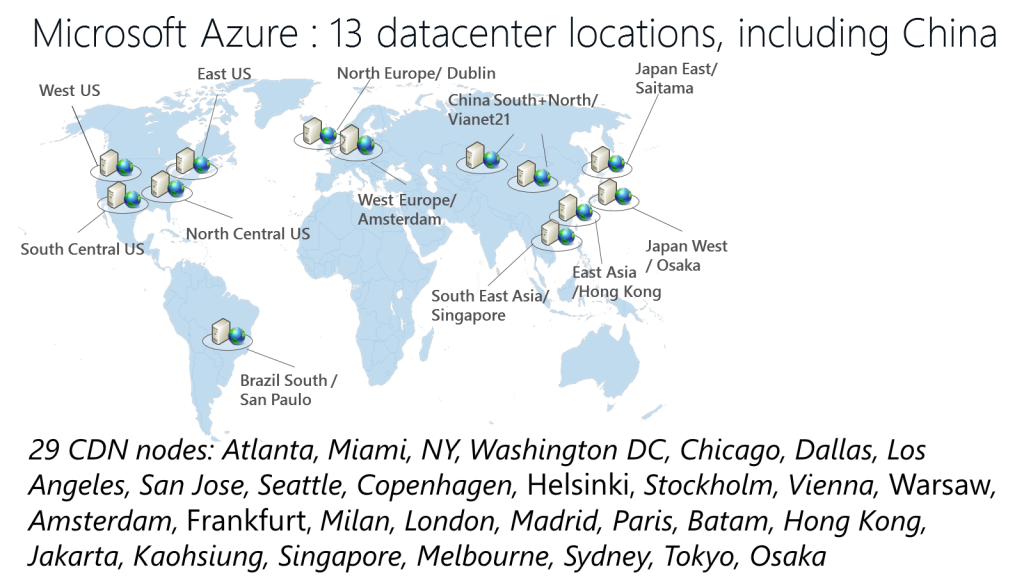
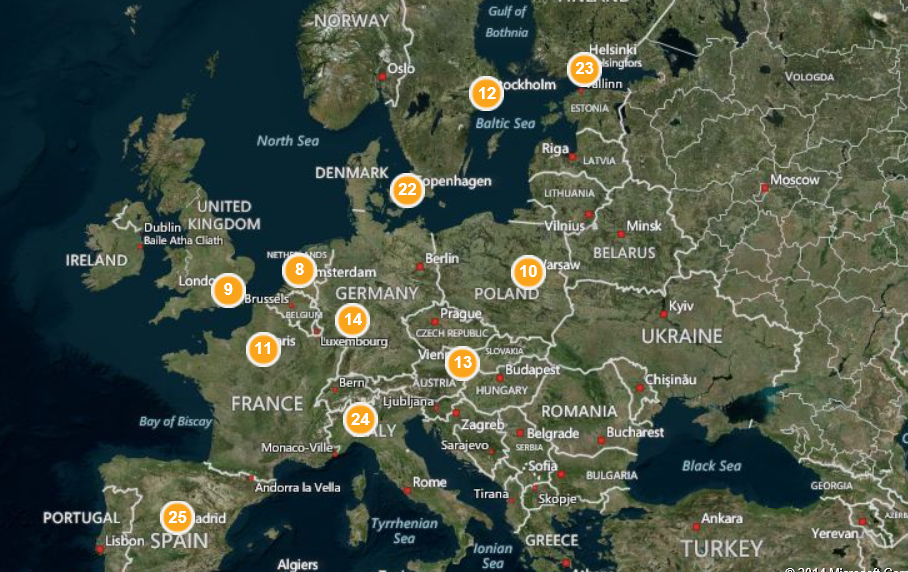
Maps of data center localizations

Although data centers are unevenly distributed, but it’s intriguing to observe the way they’re located spatially. It’s difficult to find world maps but here are some examples I found interesting, but it’s totally not exhaustive (lots of them are not documented). Also note that any queries on image search engine about data center geography leads to weather-related visualizations (which generally influence energy/water consumption for this infrastructure).

The largest US data-centers (by Nicolas Rapp, data by Dave Drazen at Geo-Tel)

DATA_MAP_FULL

Unisys Data Centers

unisys


Maps of Data Centers (Techive)
techhive


Microsoft Azure data center/CDN map (by Alexey Bokov)
azure_dc_map
azure_cdn_map_europe

Dweet.io, “one-click way to publish data from a “thing””

Note: another interesting service for declaring and sharing data… through the cloud. Possibly the most simple we went through. Dweet.io.

Also to be mentioned with a similar goal but more complete/complex, OpenRemote.


dweetio


With a new service called Freeboard, Bug Labs is giving people a simple one-click way to publish data from a “thing” to its own Web page (Bug Labs calls this “dweeting”). To get a sense of this, visit Dweet.io with your computer or mobile phone, click “try it now,” and you’ll see raw data from your device itself: its GPS coordinates and even the position of your computer mouse. The data is now on a public Web page and available for analysis and aggregation; another click stops this sharing. (MIT Technology Review)


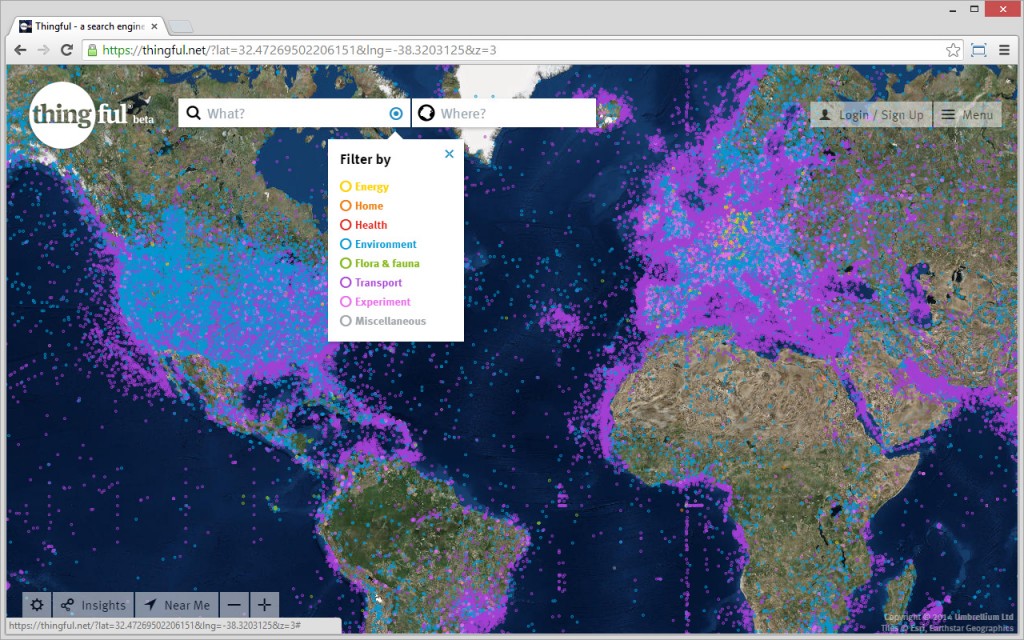
Thingful, search engine for data

Note: Thingful is a “search engine” (beta version) for data and artifacts/sensors that produce data (the coming “Internet of Things” so to say, but also and mainly weather stations, aircrafts and Rastracks at this day). Already quite loaded, the content of the search engine and its map will with no doubt explode in the close future. It is a project by former creators of Pachube (in particular Usman Haque), which was an open webservice to “store, share and discover” data from realtime sensors, now sold and therefore private… It was sold to LogMeIn in 2011 (which is somehow a sad destiny for an open data project, but this is a different story) and became then Xively.


thingful


Objects that produce data, from cities to Arduinos or mesh of sensors, through boats, trains and airplanes, etc. will with no doubt become major clients for cloud services, in parallel to the ones we already know: being distributed in the environment with very low computing capacities, these devices will just become the perfect kind of devices for such services, in need of delocalized and third parties computing.


Thingful is a search engine for The Public Internet of Things, providing a geographical index of where things are, who owns them, and how and why they are used.

Today, millions of people and organisations around the world already have and use connected ‘things’, ranging from energy monitors, weather stations and pollution sensors to animal trackers, geiger counters and shipping containers. Many choose to, or would like to, make their data available to third parties – either directly as a public resource or channeled through apps and analytical tools.

Thingful organises ‘things’ around locations and categories and structures ownership around Twitter profiles (which can be either people or organisations), enabling citizens to discuss why and how they are using their devices and data. Because, the ‘who’, ‘why’ and ‘where’ are ultimately far more important in The Public Internet of Things than the ‘what’.


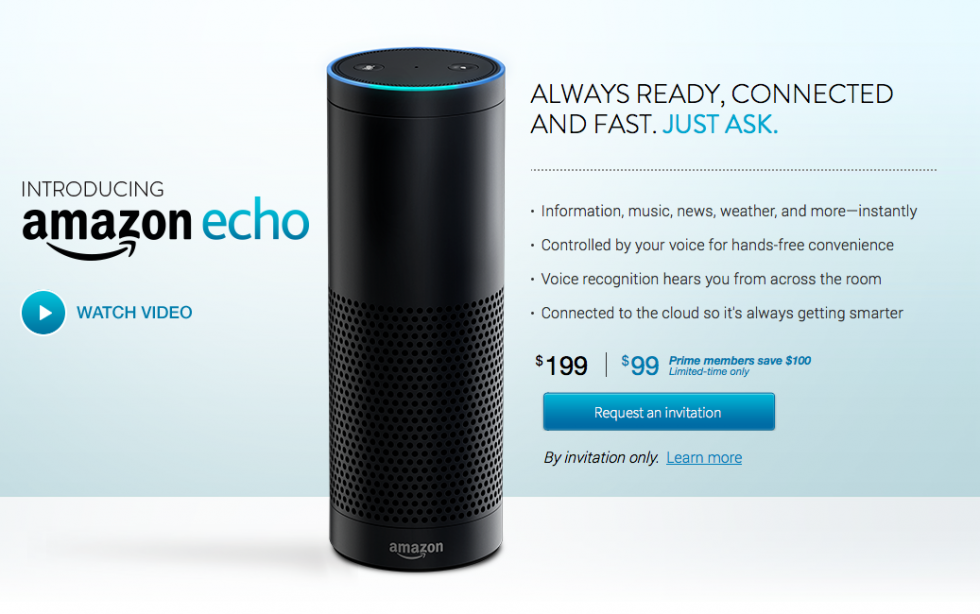
Amazon presents Echo, new cloud-enabled AI for home

By Thursday, November 13, 2014 Tags: 0066, Corporate, Object, Product, Smart Permalink 0

Echo is a connected object for your home which is activated by voice recognition. It’s a loud-speaker connected to the “cloud” via Wifi, so it’s main use seems to be streaming music. It’s apparently able to understand and answer queries said in “natural language”, like “Play some Henry Mancini” (activates your Amazon Music Library, Prime Music, TuneIn or IHeartRadio account). Of course, it’s main features are shopping-oriented but a few aren’t: you can ask for information about say, Ronald Reagan and it taps into Wikipedia and reads the page, it’s linked to weather prediction pools so you can ask about tomorrow and you can manage personal to-do lists. Unsurprisingly, “Echo’s brain is in the cloud, running on Amazon Web Services so it continually learns and adds more functionality over time”. The object’s also got a dedicated control app, which runs on Fire OS, Amazon’s new smartphone Operating System.

I&IC Workshop #2 with James Auger at HEAD: UI proposals

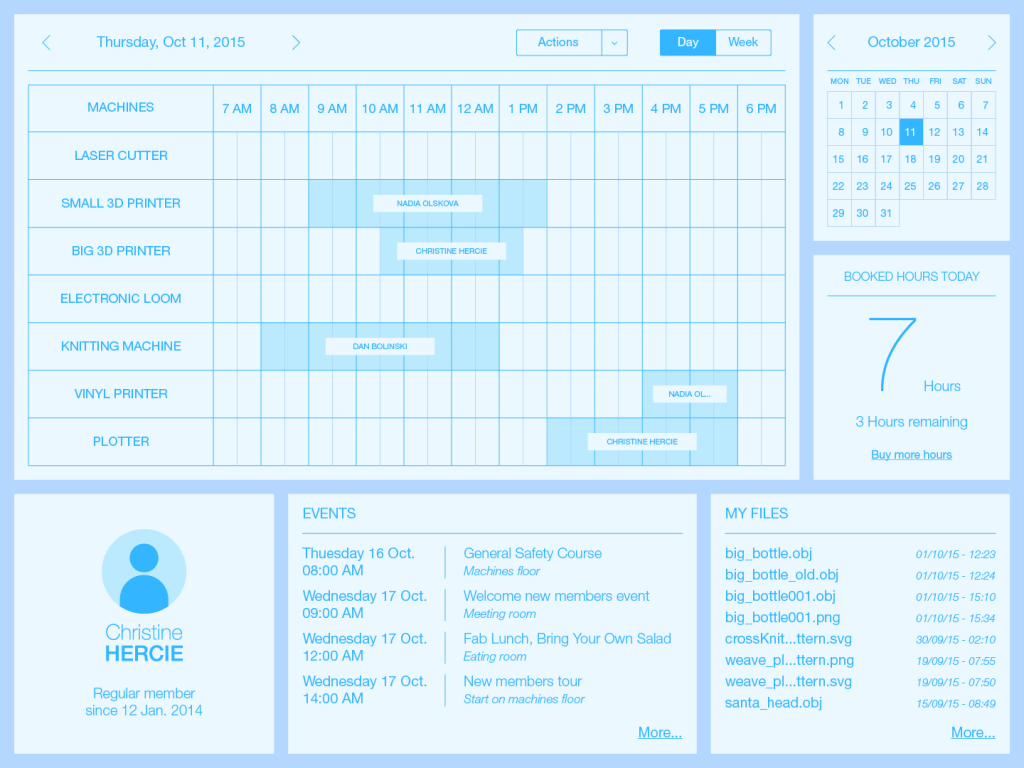
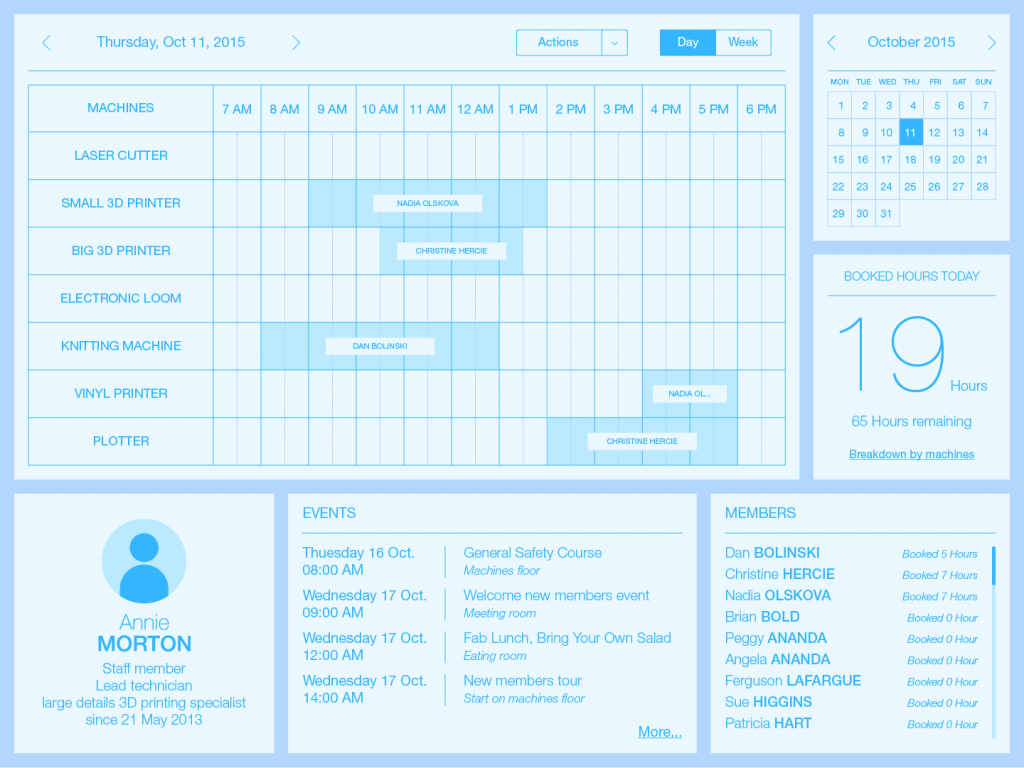
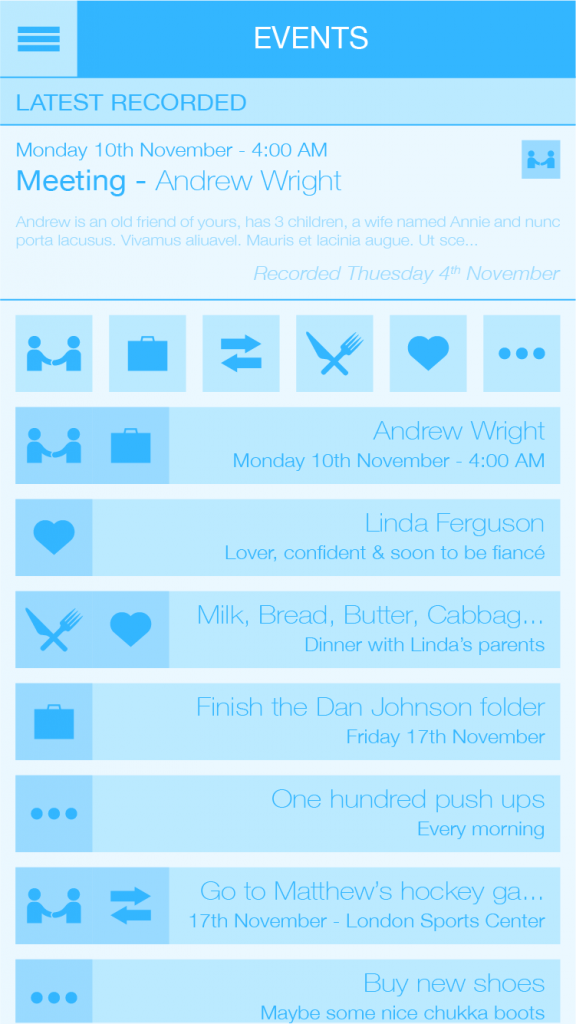
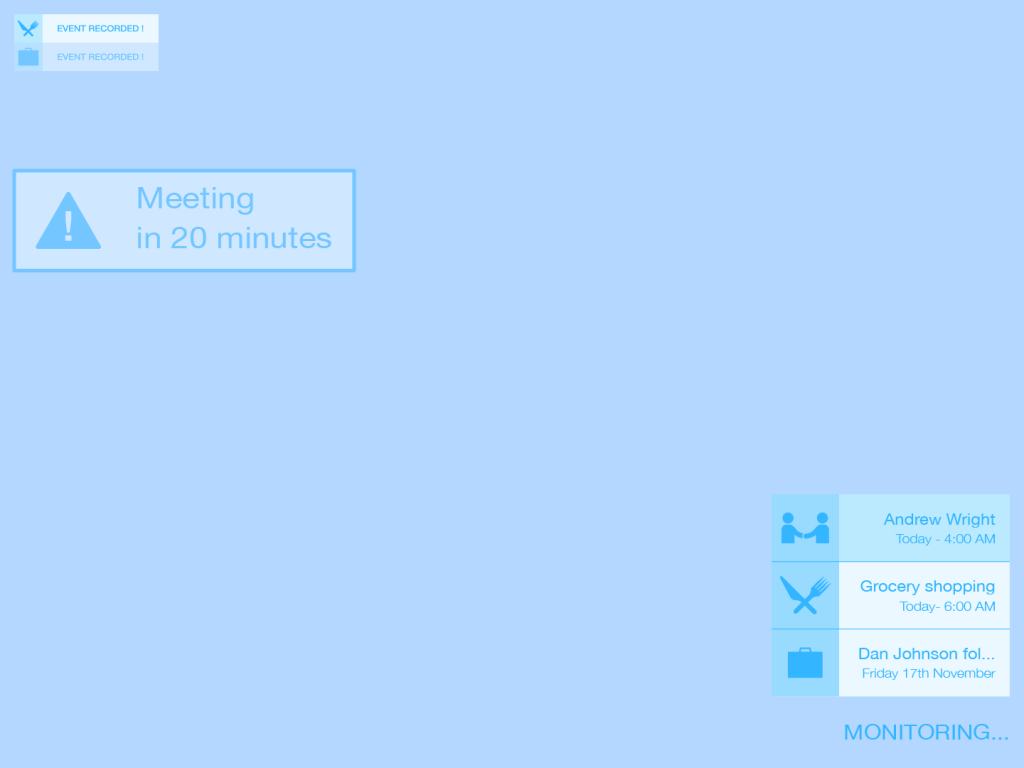
As a follow-up to the scenarios produced in our second workshop, we decided to specify the type of user interfaces that could emerge from the projects proposed by the participants. More specifically, we took each of the context they worked on and created a set of graphical user interfaces to show how the cloud computing service might appear. They are not meant to be exclusive but they illustrate the functions and possible usage discussed during the workshop. To some extent, they summarize the findings in a pragmatic way. Each of the contextual category features 2 or 3 interfaces that reflect on different types of target groups: user, system administrator, priest, sport coach, etc.


interface-tiers-lieu-01


interface-tiers-lieu-02


Third Place
The system’s purpose is to streamline the use of the various equipments. It mostly revolves around a precise schedule of the time of use for the machines. Members of the Fab Lab can book one or more hours on machines, provided that they are not already booked by someone else. Each member has a certain amount of hours to book each week and are able to buy more if needed. The Fab Lab’s staff can then monitor the machines’ schedule and dispach technicians accordingly; they can also check whether these devices require maintenance or refill. There is also a file history for each member, and a calendar of events, such as courses or social gatherings.


Interface-Smart-Coach-01


Interface-Smart-Coach-02


Smart Coach
The core of the system is embedded in a wearable heads-up display device. The video and audio from this device is streamed to a cloud server where it is analyzed in real-time. Each event considered important, according to user-selected rules, is stored and tagged into one or several categories. These events can be monitored and edited using the smartphone app. The system then provides the user with timed and localized notifications relevant to the various events. It also provides contextual informations about objects, events, people or places.


interface-instrument-01


interface-instrument-02


Music Instrument
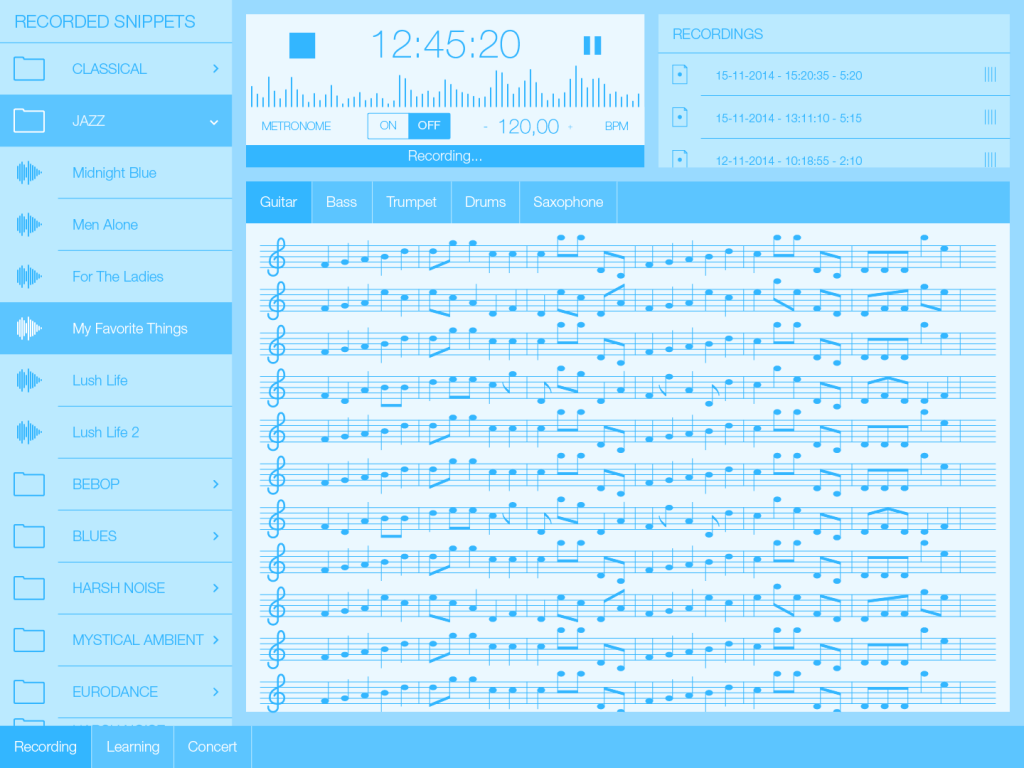
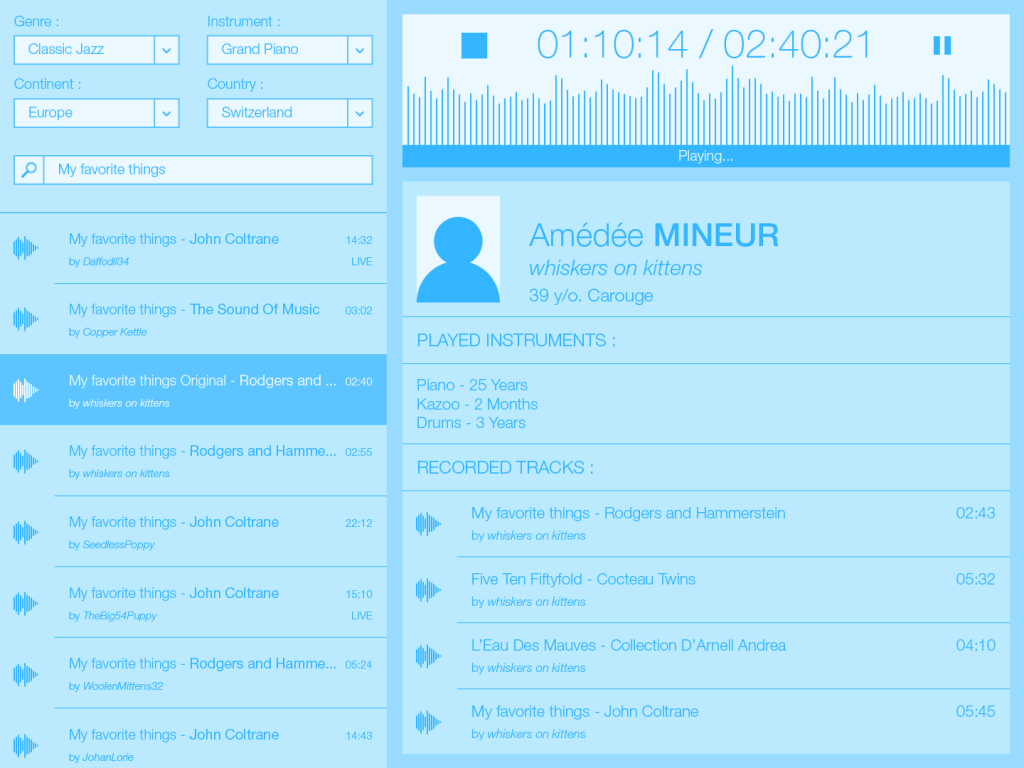
The system is connected to microphones embedded in live instruments and it is used via a tablet application. On the end-user application, there is three modes : learning, recording, and concert. The first one helps you learn and practice a musical piece, recording you to help you spot your mistakes. The second one’s purpose is to help you record a good version of the complete piece, allowing you to re-record a specific measure and to edit the whole recording together. The third mode is dedicated to live performance, providing a distraction-free environnement and recording your performance.


interface-religion-01


interface-religion-02


interface-religion-03


Religion
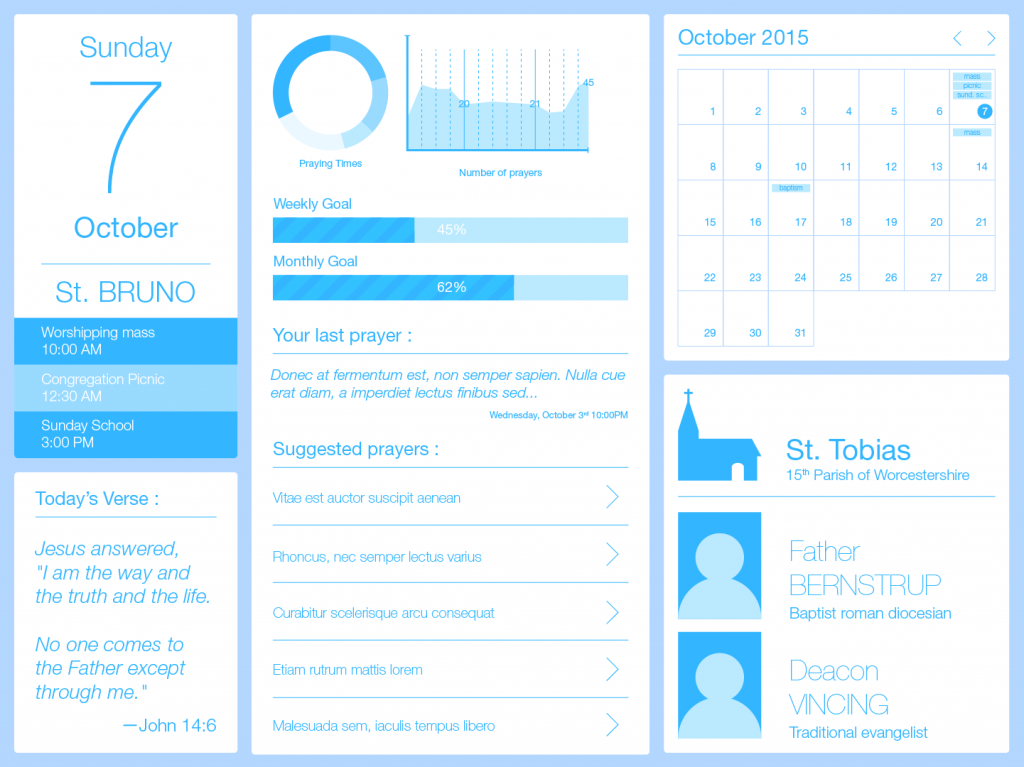
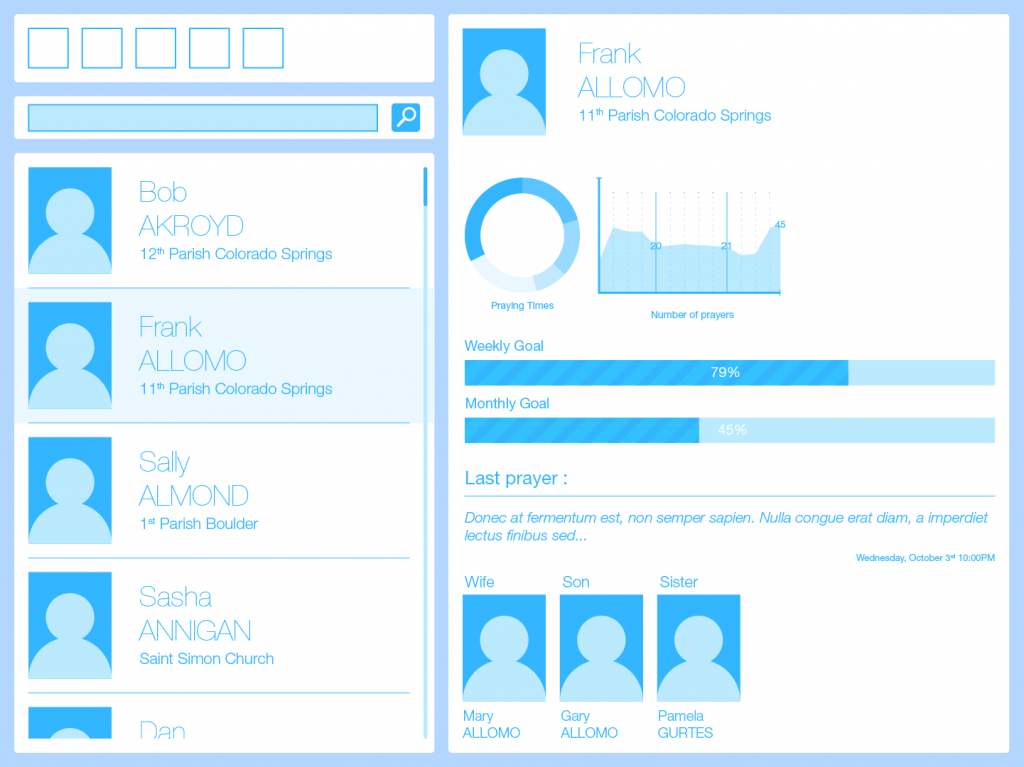
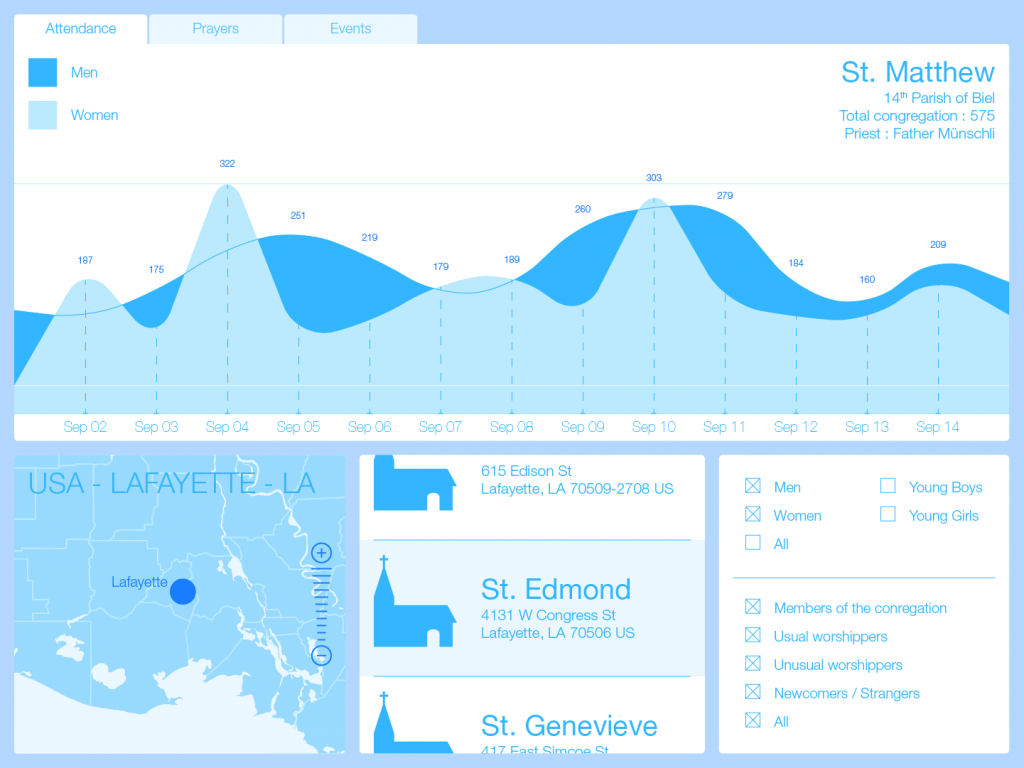
The system is based on a well hierarchized religious organization, such as the Catholic Church. It connects together the members of a religious congregation, and members of each rank of the clergy, up to the very top. It allows everyone to be informed of the religious events in their area, whether they are living there or only visiting. Each parish member has a unique profile that is used to track his or her attendance to various events, and their performance of religious rituals or obligations. The clergyman in contact with them can then monitor the behavior of his flock via a specialized version of the application. As for higher ranked members of the clergy, they are provided with big data views of the evolution of the worshipers habits, per country, city or parish.


interface-smartcity-01


interface-smartcity-mobile-01


Smart City
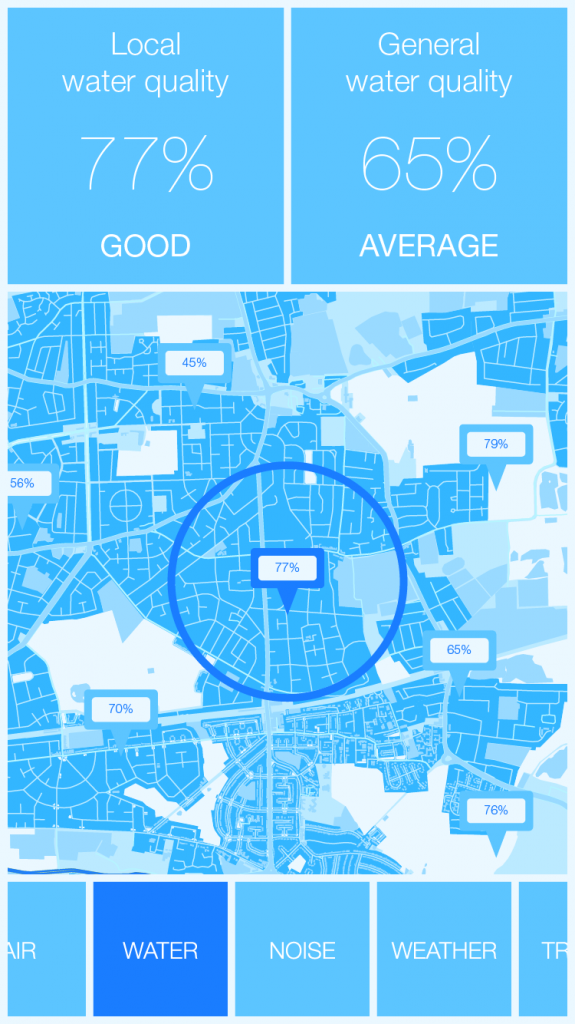
The system relies on citywide data collection and analysis based on sensors spread throughout the urban environment. These data are then accessible in their raw form by city officials, experts or technicians, and, in a more understandable digest format, by citizens. It allows for more intelligent and efficient ways to administrate the city, knowing the air and water quality, noise level and traffic, street by street.


interface-ecoquartier-01


Eco Quartier
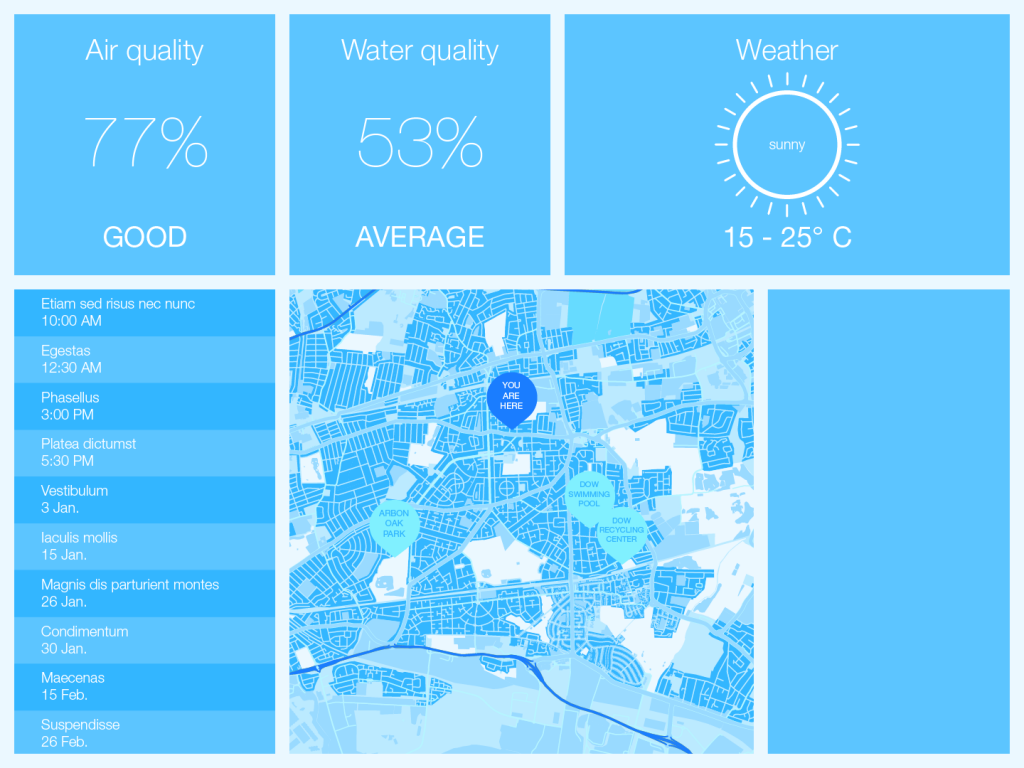
The system is essentially the same that the smart city, but on a smaller scale. A neighbourhood is monitored for air and water quality, traffic and such. Interactive panels in the streets provide these data to the population, along with informations about events in the area and location of various public usage equipments, facilities or services.